Dynamic routes
The last screen we're going to build is the details page for our plant. This will be the last big bit of UI we'll need to do in this course, so hang in there.
For this screen we'll use a dynamic route, so the url for the page will be plant/1 and we'll fetch the appropriate plant from storage based on the ID.
The routing for our app currently looks like this:
/                  <-- home tab
/new               <-- modal for creating a new plant
/profile           <-- profile tab
/onboarding        <-- onboarding modal
We want to add a new route like this
/                  <-- home tab
+/plants/[plantId] <-- plant details
/new               <-- modal for creating a new plant
/profile           <-- profile tab
/onboarding        <-- onboarding modal
How we do this actually depends on where we want the plant details page to render. Over the top of all content? Within a tab? Let's render the plant details modal inside the home screen.
How to convert a screen into a stack
Converting a screen into a stack
To convert a screen into a stack of screens, the process is:
- create a folder with the same name as the screen and move the screen inside it
- rename the screen from its original name to index
- add a _layout.tsx file in the new folder, defining a stack with the single screen
- now you can add as many screens as you'd like!
Converting the index screen into a stack
Converting a file called index into a stack is slightly different in that you use a (grouping) route instead of making a folder called index:
- create a grouping folder (group) (the name can be anything here, it's not included in the route) and move the index file inside it
- the index filename stays the same
Steps 3 and 4 are the same as for regular screens.
Convert the home screen into a stack
The home screen is currently an index file, so to make it into a stack we'll need to use a grouping route.
Create a new folder (home) in app/(tabs)/(home) and move the index file inside it: app/(tabs)/index.tsx -> app/(tabs)/(home)/index.tsx
Now update the tabs layout file to use (home) instead of index for the home page name:
Update file: app/(tabs)/_layout.tsx
@@ -18,7 +18,7 @@ export default function Layout() {
   return (
     <Tabs screenOptions={{ tabBarActiveTintColor: theme.colorGreen }}>
       <Tabs.Screen
-        name="index"
+        name="(home)"
         options={{
           title: "Home",
           tabBarShowLabel: false,
And add a layout file to the new (home) route:
New file: app/(tabs)/(home)/_layout.tsx
import { Stack } from "expo-router";

export default function Layout() {
  return (
    <Stack>
      <Stack.Screen name="index" />
    </Stack>
  );
}
You'll notice now that we end up with two headers for the home tab, so we'll need to hide one. It'll be easiest to hide the new one, but what we'll actually do is hide the existing one and move the tab bar button and details to the new layout file:
Update file: app/(tabs)/(home)/_layout.tsx
@@ -1,9 +1,28 @@
-import { Stack } from "expo-router";
+import { AntDesign } from "@expo/vector-icons";
+import { Link, Stack } from "expo-router";
+import { Pressable } from "react-native";
+import { theme } from "@/theme";

 export default function Layout() {
   return (
     <Stack>
-      <Stack.Screen name="index" />
+      <Stack.Screen
+        name="index"
+        options={{
+          title: "Home",
+          headerRight: () => (
+            <Link href="/new" asChild>
+              <Pressable hitSlop={20}>
+                <AntDesign
+                  name="plus-circle"
+                  size={24}
+                  color={theme.colorGreen}
+                />
+              </Pressable>
+            </Link>
+          ),
+        }}
+      />
     </Stack>
   );
 }
Update file: app/(tabs)/_layout.tsx
@@ -1,10 +1,8 @@
-import { Redirect, Tabs, Link } from "expo-router";
+import { Redirect, Tabs } from "expo-router";
 import Entypo from "@expo/vector-icons/Entypo";
 import Feather from "@expo/vector-icons/Feather";
 import { theme } from "@/theme";
 import { useUserStore } from "@/store/userStore";
-import AntDesign from "@expo/vector-icons/AntDesign";
-import { Pressable } from "react-native";

 export default function Layout() {
   const hasFinishedOnboarding = useUserStore(
@@ -20,22 +18,11 @@ export default function Layout() {
       <Tabs.Screen
         name="(home)"
         options={{
-          title: "Home",
           tabBarShowLabel: false,
+          headerShown: false,
           tabBarIcon: ({ color, size }) => (
             <Entypo name="leaf" size={size} color={color} />
           ),
-          headerRight: () => (
-            <Link href="/new" asChild>
-              <Pressable hitSlop={20} style={{ marginRight: 18 }}>
-                <AntDesign
-                  name="plus-circle"
-                  size={24}
-                  color={theme.colorGreen}
-                />
-              </Pressable>
-            </Link>
-          ),
         }}
       />
       <Tabs.Screen
The reason we had to do it this way is because we want to be able to show a header for our plant details page, and if we hide it at the stack level, the home page header gets shown instead.
UI for the plant details page
First let's install date-fns - we'll use it for date formatting.
npx expo install date-fns
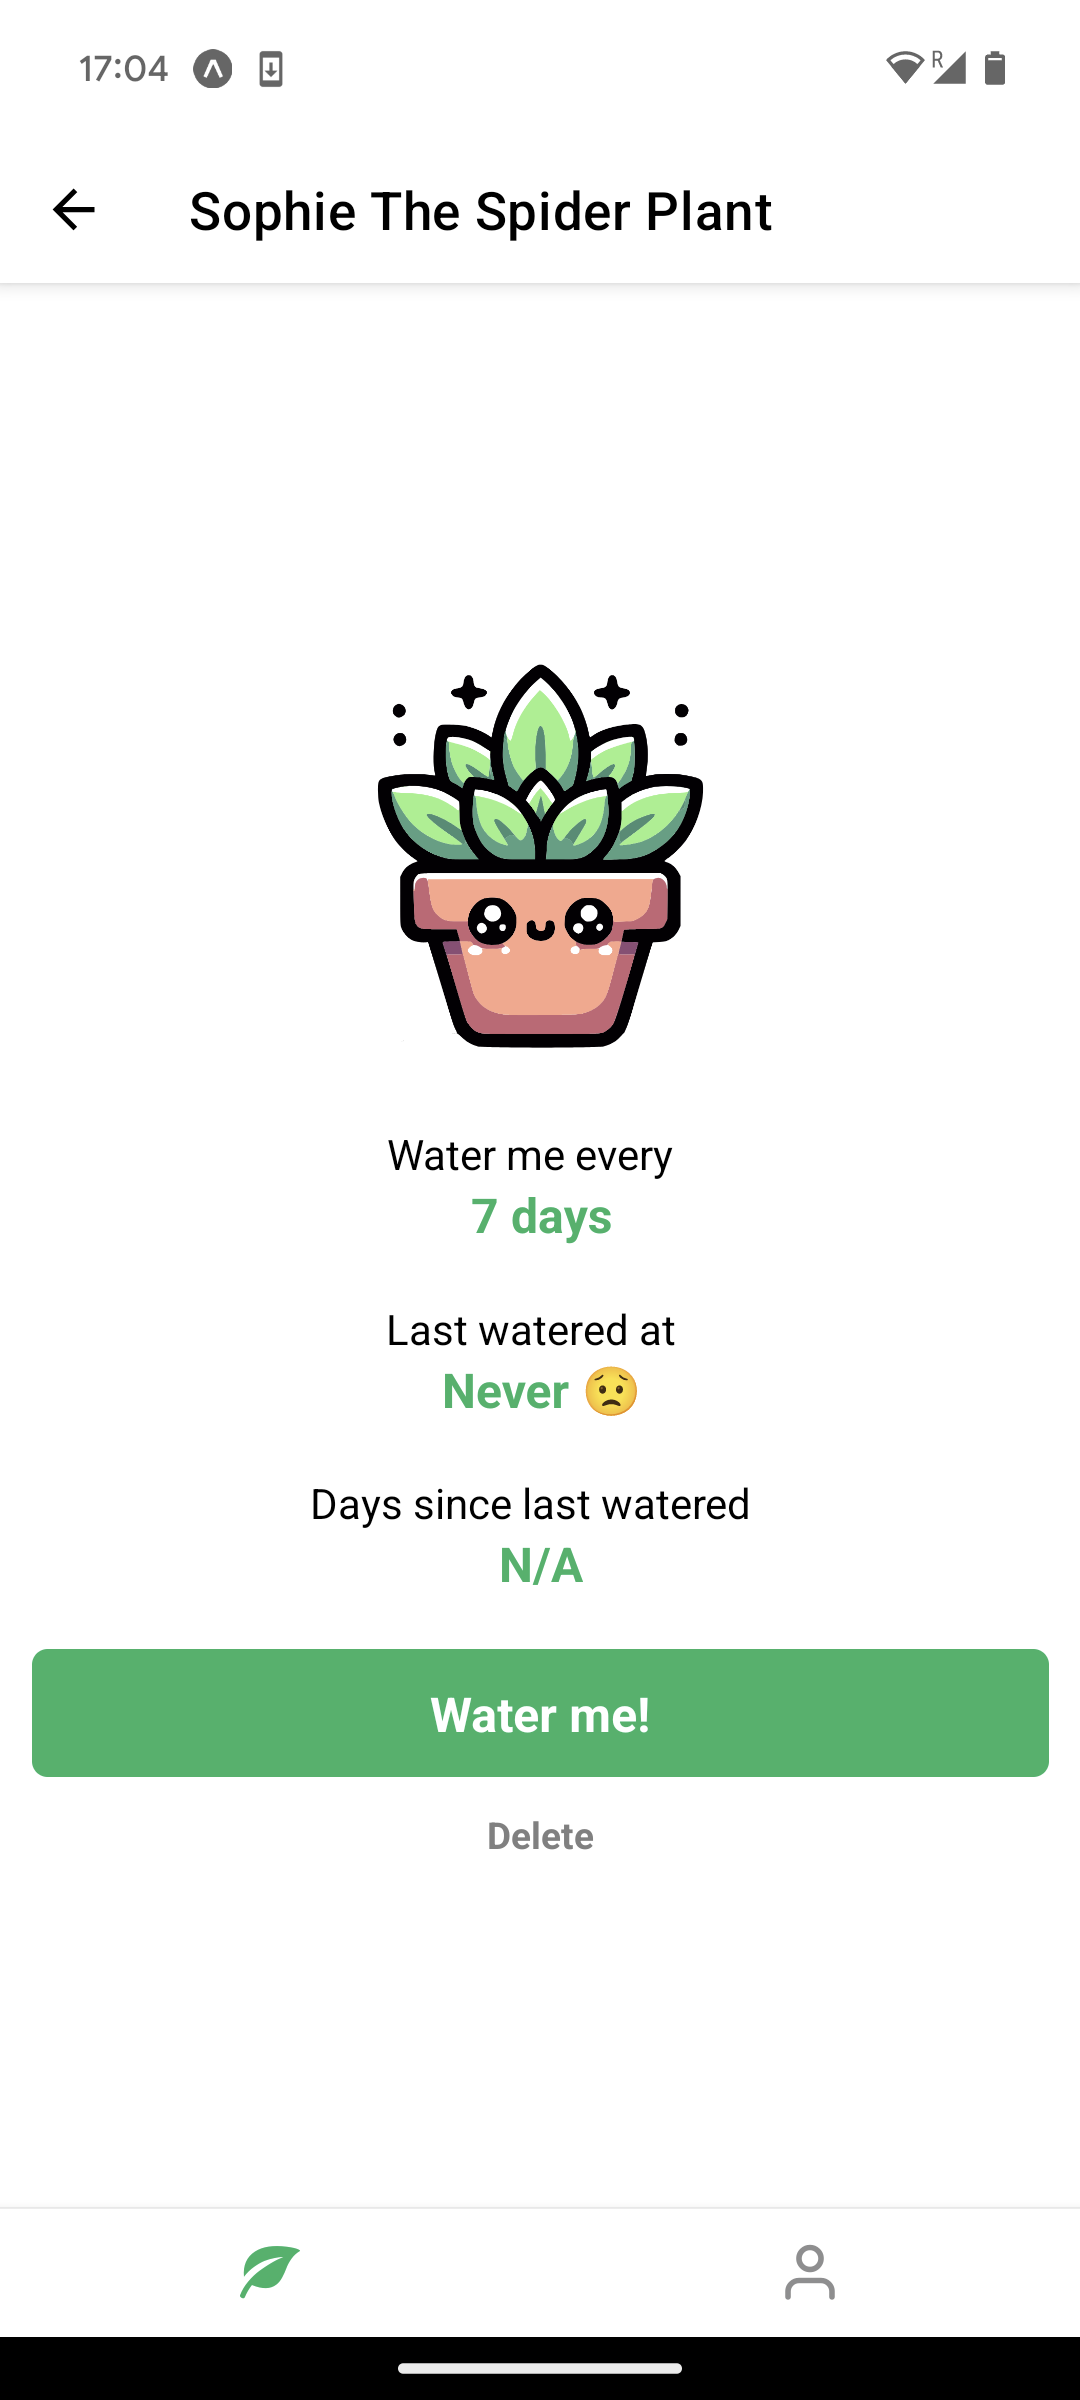
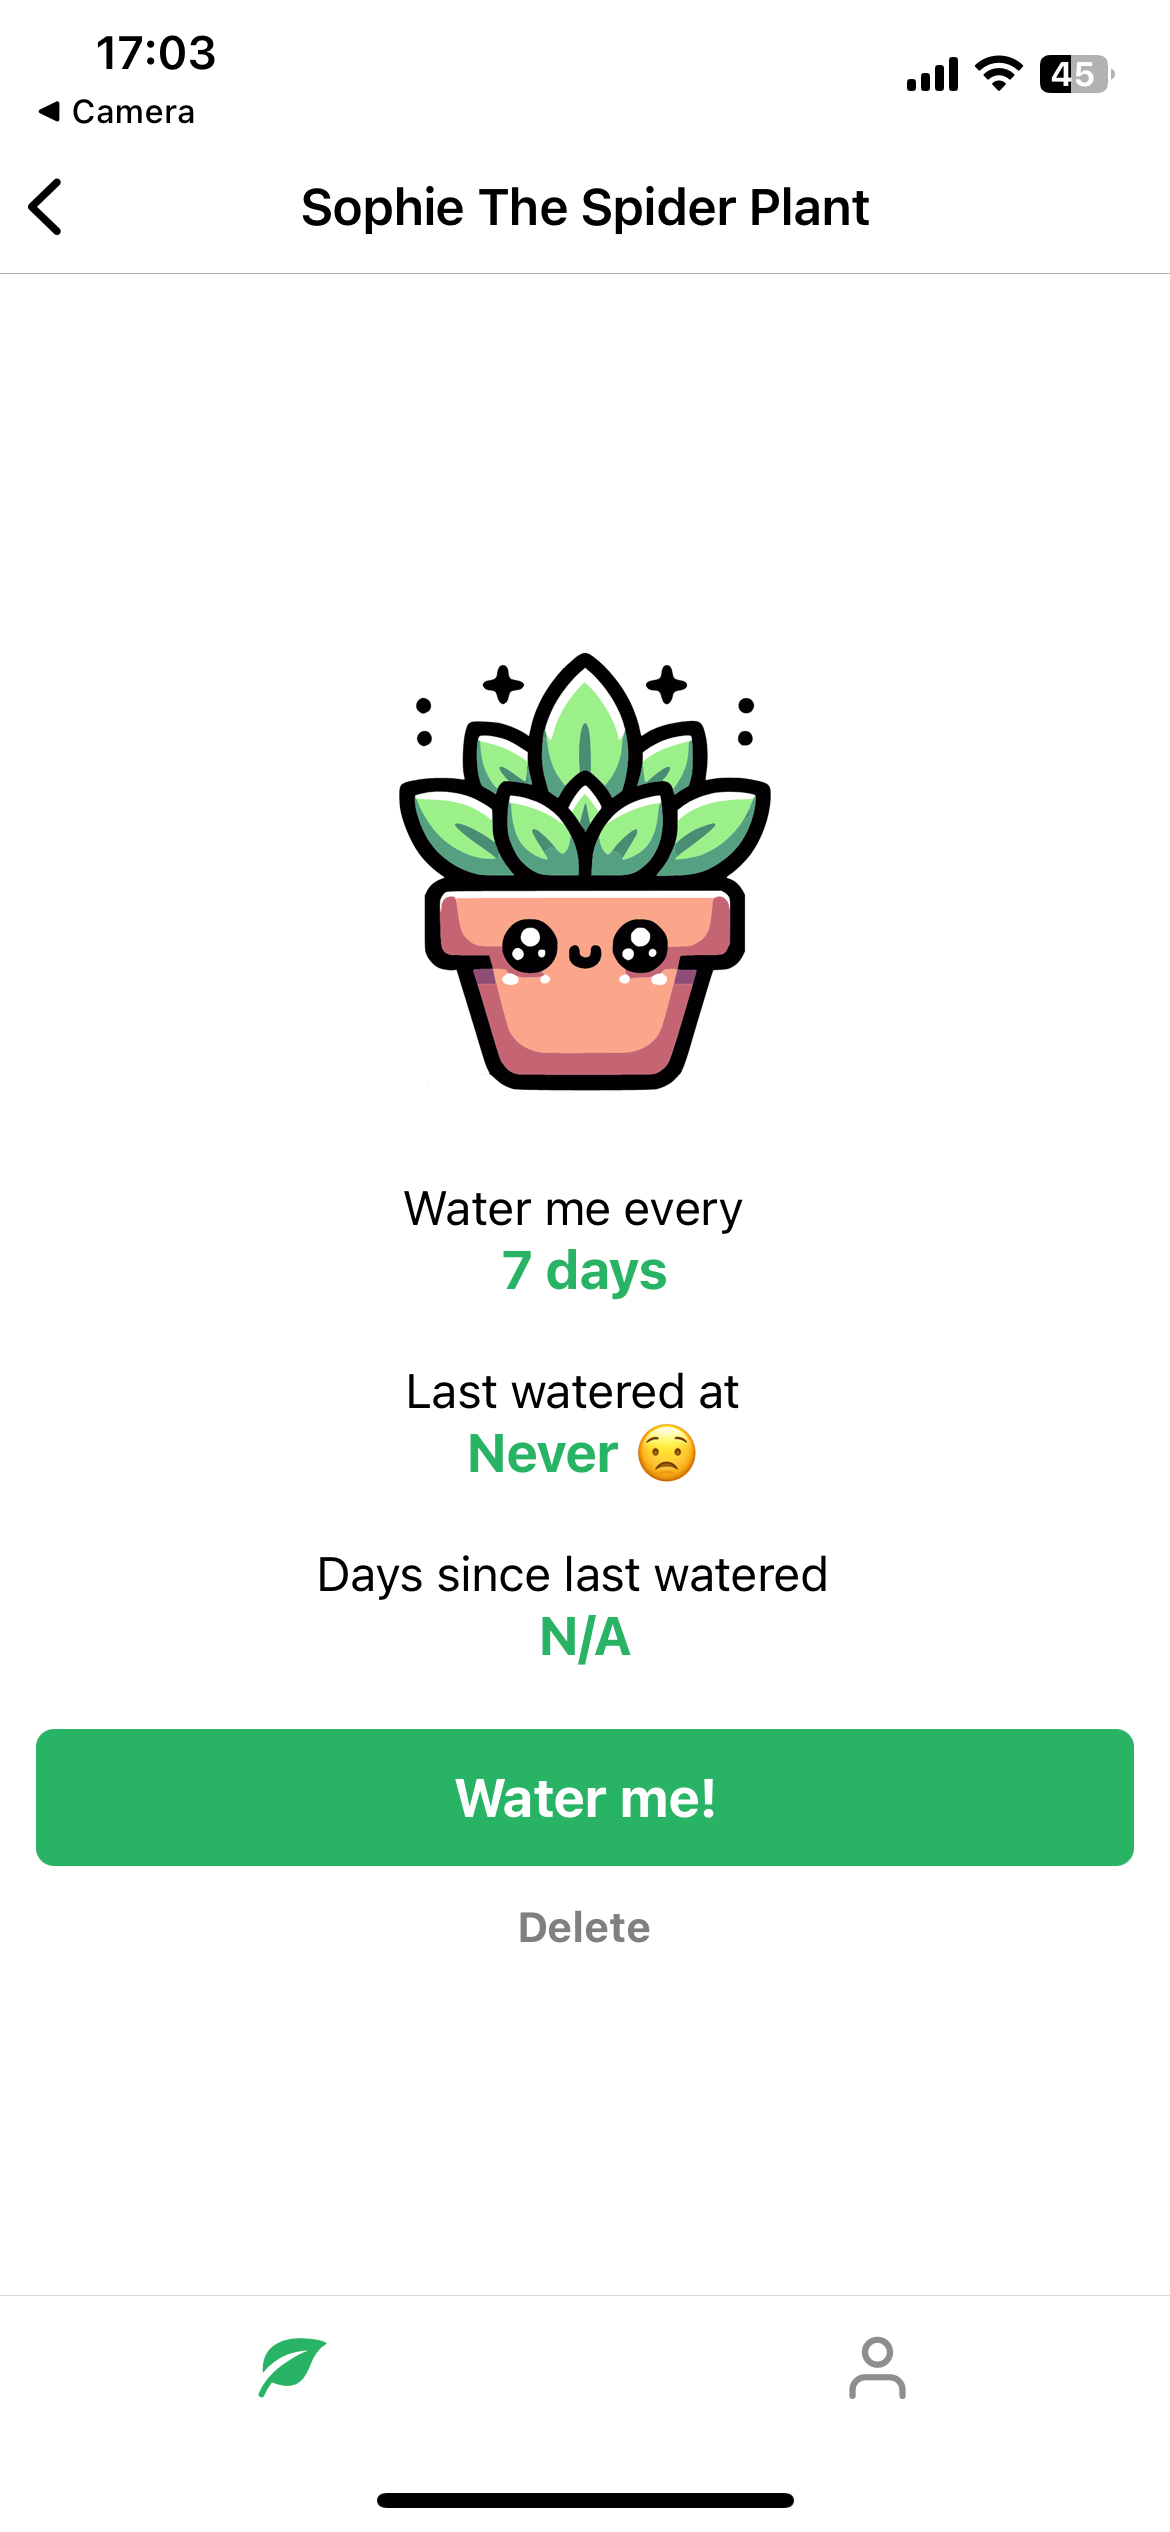
Now let's add the UI for the plant details page:
Update file: app/(tabs)/(home)/plants/[plantId].tsx
import { useLocalSearchParams, useNavigation, useRouter } from "expo-router";
import { View, Text, StyleSheet, Pressable, Alert } from "react-native";
import { usePlantStore } from "@/store/plantsStore";
import { differenceInCalendarDays, format } from "date-fns";
import { PlantlyButton } from "@/components/PlantlyButton";
import { theme } from "@/theme";
import { useEffect } from "react";
import { PlantlyImage } from "@/components/PlantlyImage";

const fullDateFormat = "LLL d yyyy, h:mm aaa";

export default function PlantDetails() {
  const router = useRouter();
  const waterPlant = usePlantStore((store) => store.waterPlant);
  const removePlant = usePlantStore((store) => store.removePlant);
  const params = useLocalSearchParams();
  const plantId = params.plantId;
  const plant = usePlantStore((state) =>
    state.plants.find((plant) => String(plant.id) === plantId),
  );
  const navigation = useNavigation();

  useEffect(() => {
    navigation.setOptions({
      title: plant?.name,
    });
  }, [plant?.name, navigation]);

  const handleWaterPlant = () => {
    if (typeof plantId === "string") {
      waterPlant(plantId);
    }
  };

  const handleDeletePlant = () => {
    if (!plant?.id) {
      return;
    }

    Alert.alert(
      `Are you sure you want to delete ${plant?.name}?`,
      "It will be gone for good",
      [
        {
          text: "Yes",
          onPress: () => {
            removePlant(plant.id);
            router.navigate("/");
          },
          style: "destructive",
        },
        { text: "Cancel", style: "cancel" },
      ],
    );
  };

  if (!plant) {
    return (
      <View style={styles.notFoundContainer}>
        <Text style={styles.notFoundText}>
          Plant with ID {plantId} not found
        </Text>
      </View>
    );
  }

  return (
    <View style={styles.detailsContainer}>
      <View style={{ alignItems: "center" }}>
        <PlantlyImage imageUri={plant.imageUri} />
        <View style={styles.spacer} />
        <Text style={styles.key}>Water me every</Text>
        <Text style={styles.value}>{plant.wateringFrequencyDays} days</Text>
        <Text style={styles.key}>Last watered at</Text>
        <Text style={styles.value}>
          {plant.lastWateredAtTimestamp
            ? `${format(plant.lastWateredAtTimestamp, fullDateFormat)}`
            : "Never 😟"}
        </Text>
        <Text style={styles.key}>Days since last watered</Text>
        <Text style={styles.value}>
          {plant.lastWateredAtTimestamp
            ? differenceInCalendarDays(Date.now(), plant.lastWateredAtTimestamp)
            : "N/A"}
        </Text>
      </View>
      <PlantlyButton title="Water me!" onPress={handleWaterPlant} />
      <Pressable style={styles.deleteButton} onPress={handleDeletePlant}>
        <Text style={styles.deleteButtonText}>Delete</Text>
      </Pressable>
    </View>
  );
}

const styles = StyleSheet.create({
  notFoundContainer: {
    flex: 1,
    justifyContent: "center",
    alignItems: "center",
    backgroundColor: theme.colorWhite,
  },
  notFoundText: {
    fontSize: 18,
  },
  detailsContainer: {
    padding: 12,
    backgroundColor: theme.colorWhite,
    flex: 1,
    justifyContent: "center",
  },
  key: {
    marginRight: 8,
    fontSize: 16,
    color: theme.colorBlack,
    textAlign: "center",
  },
  value: {
    fontSize: 18,
    fontWeight: "bold",
    textAlign: "center",
    marginBottom: 20,
    color: theme.colorGreen,
  },
  deleteButton: {
    padding: 12,
    justifyContent: "center",
    alignItems: "center",
  },
  deleteButtonText: {
    color: theme.colorGrey,
    fontWeight: "bold",
  },
  spacer: {
    height: 18,
  },
});
Update the home layout to add the plant details screen:
Update file: app/(tabs)/(home)/_layout.tsx
@@ -23,6 +23,13 @@ export default function Layout() {
           ),
         }}
       />
+      <Stack.Screen
+        name="plants/[plantId]"
+        options={{
+          title: "",
+          headerBackTitle: "",
+          headerTintColor: theme.colorBlack,
+        }}
+      />
     </Stack>
   );
 }
And finally update the PlantCard component, wrapping it into a link that points to the details page:
Update file: components/PlantCard.tsx
@@ -1,21 +1,24 @@
-import { StyleSheet, View, Text } from "react-native";
+import { StyleSheet, View, Text, Pressable } from "react-native";
 import { theme } from "@/theme";
 import { PlantType } from "@/store/plantsStore";
 import { PlantlyImage } from "./PlantlyImage";
+import { Link } from "expo-router";

 export function PlantCard({ plant }: { plant: PlantType }) {
   return (
-    <View style={styles.plantCard}>
-      <PlantlyImage size={100} imageUri={plant.imageUri} />
-      <View style={styles.details}>
-        <Text numberOfLines={1} style={styles.plantName}>
-          {plant.name}
-        </Text>
-        <Text style={styles.subtitle}>
-          Water every {plant.wateringFrequencyDays} days
-        </Text>
-      </View>
-    </View>
+    <Link href={`plants/${plant.id}`} asChild>
+      <Pressable style={styles.plantCard}>
+        <PlantlyImage size={100} imageUri={plant.imageUri} />
+        <View style={styles.details}>
+          <Text numberOfLines={1} style={styles.plantName}>
+            {plant.name}
+          </Text>
+          <Text style={styles.subtitle}>
+            Water every {plant.wateringFrequencyDays} days
+          </Text>
+        </View>
+      </Pressable>
+    </Link>
   );
 }
Checkpoint
| Android | iOS |
|---|---|
 |  |